6 Tips to Minimize Deck Board Cupping and Make Your Deck Last Longer

by Rebecca
(UK)

I’ve recently had a large deck built by a professional decking company. Only a few weeks ago we began to notice the boards are cupping and twisting. It seems they used two screws in each board at either end, but all the joists in the middle only had one screw. The wood rotates when you walk along it. Is this usual?

Editor's Comments

The problem of deck boards cupping is common but it should not be happening! There are a number of ways to prevent this and fix your problem - and make your deck last longer.

From what you are describing there could be a few different reasons why your deck is acting the way it is, and the most likely cause is the way the boards are nailed down. This is something that a lot of people have questions about, and so I would like to present you with what you can do to try and prevent your deck boards from cupping, and what to do if they already have!

Tip #1 - Fastening Deck Boards

The strongest way to secure deck boards to joists is by using the top down (face mount) screw method. This means using two screws on each end, and using two screws towards the outside of the boards at every joist along the way.

Doing this will help keep the boards firmly in place and won’t give it the freedom to warp or cup.

If you already have boards that have cupped upwards, you could unscrew and flip each of the boards and rescrew them down.

In the case of having one screw hole at each joist, you have two options:
  • Flipping and filling in the hole with wood filler, and sanding it down (but it would leave a tiny mark), or
  • You could reuse that center hole and use three screws to fasten the boards to the joists.
Either way, it is important to have at least two screws, one on either side of your deck boards.

Another important thing to keep in mind is that you can use longer screws to help hold the boards more firmly in place. We recommend at least a 3” screw with 5/4 deck boards.

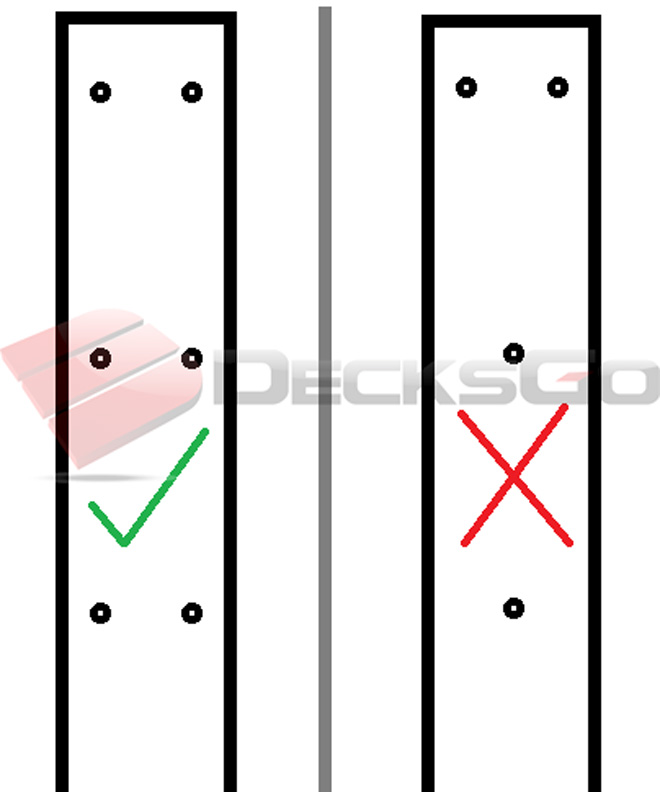
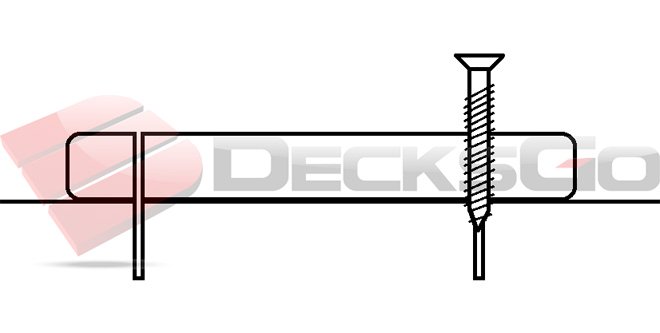
Looking at the diagram below, the example on the left shows screwing down both sides of the deck board at the ends and at every joist along the way.

This is how it should be done.

The example on the right shows screwing down the deck board at the ends with two screws, but only one screw at every joist. This does not secure your deck boards and can allow your boards to move, cup, and warp.

This should be avoided!

Nailing: Yes and No

Tip #2 - Decreasing Distance Between Joists

Joists are something to think about more as a preventative measure while building your deck, and less as a quick fix after the deck is built.

Decreasing the distance between your deck joists means that your deck boards are secured in more locations, span a shorter distance, and help prevent any unwanted cupping or warping.

This helps solidify the deck overall and helps hold the structure together more firmly.

It is possible to do this once your deck is built, but it would require removing all of your deck joists and starting from scratch. This would be a bit of a larger undertaking than you were expecting.

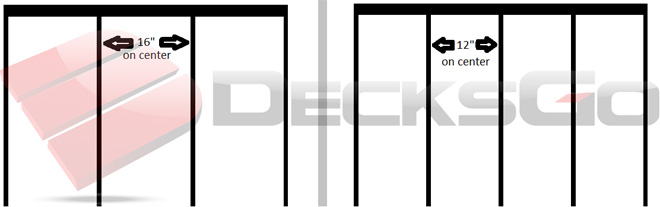
16” is the normal distance as shown in the diagram below on the left, on the right shows the reduced distance of 12” between joists. This means less distance between your screws and keeps your deck boards more secured.

NOTE: “on center” means from the middle of the joist and not the edge. When we say 16” or 12” on center we mean from the middle of one joist to the middle of the next.

Distance between joists, decreasing from 16 inches to 12 inches

Tip #3 - Making Kerf Cuts to Relieve Tension

Kerf cuts are small grooves sawed into the underside your deck boards using a circular or table saw to relieve the surface tension. Blade widths are usually 1/8”

Make sure that the cuts are evenly spaced either one cut creating two halves, two cuts creating thirds, three cuts creating quarters, ect. as shown in the example below.

Example of kerf cuts

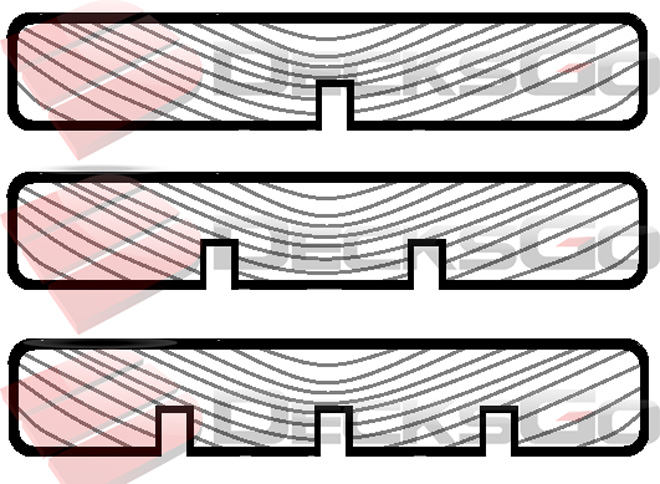
If your boards are 5/4” thick, you would only want to go in 1/2”. It is not meant to go all the way through the board, but to just relieve tension.

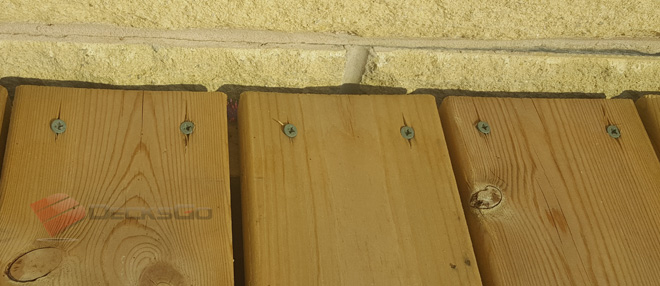
Tip #4 - Using Pilot Holes to Prevent Splitting

While using pilot holes won’t affect the cupping of your deck boards, it will prevent them from splitting at the ends.

This is important to help the longevity of your deck, and caring for your deck boards.

Use them where you would put your screws, especially at either end of your boards.

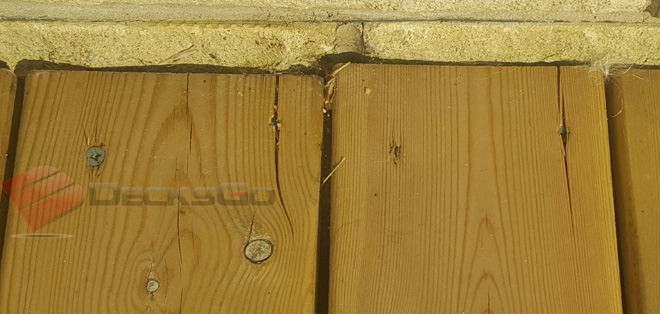
A pilot hole is a pre-drilled hole to help guide your screw. The image below shows it is smaller than the diameter of your screw. It removes some of the wood to alleviate pressure and prevent boards from splitting. This is especially important at the end of your deck boards.

How to make a pilot hole

The ends of your deck boards are a little more delicate and have a greater potential to split, if you pre-drill holes first, it will allow your screws to go in smoothly and alleviate the pressure that can cause cracking and splitting.

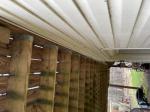
If you look at the next image, you can see how some of the screws have caused splitting from the screw to the end of the deck board. This can eventually cause corners of your boards to come off completely, and stops the boards from adhering strongly to your joists.

Example of wood splitting from screws

Tip #5 - The Bark Debate (Up vs Down)

This is a topic that sparks a lot of debate amongst deck building professionals.

Some are absolutely certain that bark side up is the way to go.

Here at Decksgo, our experience (and the experience of other professionals) has said the opposite. We know it’s important to put your boards bark side down.

The image below shows a deck that was built bark side up and has begun cupping upwards.

Example of deck boards cupping upwards (convex)

From our experience, wood likes to stretch and straighten out most along the grain line, so you want to keep your grain lines as short as possible in the wood that you’re using.

When looking at the image below, the image on the left shows bark side up, which causes the boards to cup upwards (convex).

The image on the right shows that putting bark side down will cause the board to try cupping downwards (concave). This is more difficult to do if the deck boards are secured properly.

Convex versus concave cupping based on bark side up or down

Tip #6 - Quality of Wood

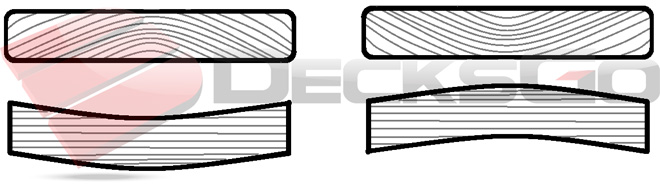
I’ve left this for last because it goes without question. Your deck will only be high quality if you use high quality materials. Whether you’re using various types of wood, or synthetic materials, your deck can only be as good as the quality of products you use.

Below is an image that shows the various types of cuts of dimensional lumber. It shows what part of the log is best to use, and what parts are going to be less stable.

Different types pf saw cuts from a log

Quarter sawn lumber would be ideal, but it’s very unlikely you’ll find it in softwood as it’s a lot of work and most mills won’t cut their lumber this way (it is also expensive to cut lumber this way).

You’re most likely to find flat sawn lumber. If you look at the grain lines in the image to the right, you’ll see that the flat sawn lumber from closer to the center of the tree have shorter grain lines. This is the type of lumber you want to aim for.

The pieces towards the bark (also known as sapwood) have longer grain lines from one side of the board to the other. This will cause your lumber to be more unstable and has the highest chance of cupping and other unpredictable forms of warping.

Try to avoid long grain lines through your deck boards. Like the image at the top of this diagram.

If you have shorter grain lines you are less likely to have cupping issues.

Long grain lines versus short grain lines

If you have wood that has really long grain lines and is from this outer sapwood part of the tree, you’re better to use the tools and tips given in this article above to secure your deck boards down as much as possible and try and stop it from moving.

Happy Deck Building!

Home  >  Building Tips & Ideas  >  6 Tips To Minimize Deck Board Cupping


More Resources


Video: Dynamics of Wood Deck Boards Discussion

Comments for 6 Tips to Minimize Deck Board Cupping and Make Your Deck Last Longer

Average Rating starstarstarstarstar

Click here to add your own comments

Feb 01, 2024
Rating
starstarstarstarstar
Cupping NEW
by: jeff w.

In my 50+ years of woodworking/carpentry, I have seen both sides cup. The "wet" up side idea is very subjective. Surface moisture and bound moisture occur in wood. Kiln dried wood can sit in the open weather for months. To dry the KD wood before the project, and then sort the wood, is a tedious yet noble task. Think about the parallel to air-drying firewood.
Also, cutting the bottom stress-relief dado cut shouldn't affect rot, if the wood is truly pressure-treated.
I had a deck boards installed in a deck built in NH require replacing in 2015. My current project built is a 2x6 PT deck built in mid 1980. The boards, are heavy and water-logged from roof run off, yet they are South-facing with no shade.
Please use 304 stainless steel fasteners with PT.

Apr 17, 2022
Rating
starstarstarstarstar
Bark Up NEW
by: Richard Barnett

Then there are positions that the wood industry takes. The Southern Forest Products Asso. advises bark side up as does Georgia Pacific installation information for pressure treated lumber.

I used best side up. Bark side next. Always predrill. Placement of screws important.
Stay away from too many "wing knots".

Mar 01, 2021
Rating
starstarstarstarstar
No rhyme or reason
by: Mike

I have two exterior stairwells with double 2" x 6" treated pine treads. One is on the back porch (morning sun) and one on the front (afternoon (hotter and longer) sun). The back stairwell was done with #2 treated pine 22 years ago with both bark side up and down and the front was replaced about 10-12 years ago with #1 treated (kiln dried?) pine bark side up. The back stairwell shows VIRTUALLY NO CUPPING whereas the front shows significant cupping in a downward direction, i. e. the boards are arched up on top with significant cracking and deterioration. I an getting ready to redo again and took one tread off and noticed that the underside was very damp. It leads me to believe that the boards cup in the direction of most moisture and least heat (sun).

Oct 02, 2020
Rating
starstarstarstarstar
article did NOT say bark side up...based on their experiences NEW
by: Anonymous

First response about article suggesting bark side up is not what the article states nor the diagram shown. They said some state bark side up is the way to go but from THEIR experience is it the exact opposite (bark side down) to minimize cupping. Ever the side by side pictures underneath this part of of the article show the bark side down is a better solution for cupping.

Jul 13, 2020
Rating
starstarstarstarstar
Cupping
by: Jack

This article is right about the bark side up theory. It's BS. I installed 5/4 boards while wet and followed bad advice and installed them bark side up. Almost all my boards cupped. I'm in the process of flipping them. If I ever build another deck using 5/4 boards I will buy the wood a month or 2 before installing them. That way you will see what side is cupping before installation.
I've kept brand new boards, chosen by myself, in my garage away from the sun and most of the 80 or so boards were already showing signs of cupping. So the theory that the sun is solely to blame is not exact. I bought some this year and they were wet as rain and some were showing signs of cupping. It's all in the grain and how they're cut.

Nov 13, 2019
Rating
starstarstarstarstar
How to prevent 1x6 ipe from cupping
by: Dave

Great article! I'm looking to build a deck that will be 16" above grade. I'm looking into using 1x6 ipe boards and my understanding is that this dimension is more prone to cupping. How deep and many relief cuts would I need to minimize/eliminate cupping? I'm also planning on using the Camo system of hidden fasteners. Will this be as effective as face screwing? Thanks!

Aug 02, 2019
Rating
starstarstarstarstar
What about lots of knots that are now falling out?
by: Mbrobb

I just had my deck rebuilt on the old foundation. We had pressure treated pine and I chose to go with cedar. Although the pine appeared to be about 1" thick, the cedar used is half as thick. And most of the boards now have some cupping, visible when it rains.

additionally, the wood has lots and lots of knots, all of which are now cracking, some crumbling and some dropping out whole, leaving holes in the deck. Should I be concerned? I went with a reputable deck company (Deck Guardian), but I’m concerned.

TIA

May 16, 2019
Rating
starstarstarstarstar
Deck cupping
by: Jim

Great article almost common sense but stil one of those things that every now and then you need to be reminded

Aug 27, 2018
Rating
starstarstarstarstar
Paint All Sides
by: DougR

This is an excellent and thoughtful article with useful observations. My house has 5 decks, which were painted by the previous owner. Three upper decks with redwood boards painted on all sides have much less cupping and splitting than the other two decks. I'm replacing a deck that's closer to the ground and elected to apply two coats of paint to all sides of the decking before screwing it down. I'm doing everything I can to keep the ground dry underneath the deck. I hope this works.

Aug 11, 2018
Rating
starstarstarstarstar
Concern about rot from relief cut
by: Mikey

I like the idea of the relief cut to minimize cupping; however, it raises a question: will the entire relief need to be treated with and end cut sealer? Thank you.

Aug 03, 2018
Rating
starstarstarstarstar
What to replace with???
by: BRUCE

Replacing 1500' of decking because I used Restore 5 years ago which is now peeling and has caused boards to rot. Stcrews are rusted because of this and saving those boards is close to impossible. (5/4 pressure treated pine). Thinking of putting down 2x6 Yellawood (suggestions/concerns I need to know) and attach with Camo system. Question I have is should I purchase those boards with stress relief groves or cut them in myself? Groves (2) will be 1/8" in width and 1/2" in depth. This will save a little bit of money but will also take more time to put down. I am also up for any suggestions that will preclude me from having to redo this deck in ly life time (69 years old). Live in Alabama and the deck in ALWAYS being blasted by the sun. Deck is well off the ground and,joists are 16" OC. Cheers

Jul 05, 2018
Rating
starstarstarstarstar
Cupping Doug Fir Deck Boards
by: Tony

I'm looking at this in mid-2018, but have just put down a new deck surface on an existing structure.

The joists are on 24" centers. I know, I know, but I didn't build it and it's sound. I used pressure treated douglas fir, 2x6x144.

The wood came in wrapped skids that was very wet from the plant. All well and good. It was put down with Camo system hidden fasteners through the shoulders of the boards with a 1/16" gap.

It's now dried to a 1/4 gap and about 25% of the boards are cupping UP. I knew that the rings should have been concave side down, but most boards had a good and a bad side. Hence, I put the good side up. As I don't want to face-screw, I think the best option at this point is to let it fully cure, rent a floor sander, sand it level and retreat. After all, I have 1 5/8" to work with. At the most I'll be taking 1/4" off an edge...

Editor's Comments
Very important to let wood acclimate to its environment before installing, particularly when the lumber is so green (wet). If the boards have cupped upwards so much and they were screwed down through the upper shoulder how well are are connected to the joists now? Sanding will flatten them out but will you also be sanding down the deck screws? You may have to consider a face down screw and use some plugs if you wish.

Nov 28, 2017
Rating
starstarstarstarstar
Cupping
by: Don

I think the several boards on my deck are where the builder used a solid 2x8 blocking underneath where deck boards meet at borders. So that the underside has no ventilation. Make sense?

Editor's Comments

That might be part of the problem and it could be exacerbated by the particular species of wood also in that kind of situation. For example, if the would has very large growth rings it will be susceptible to large swings in moisture and humidity whereas a board with tighter growth rings will be a bit more stable.

If your builder oriented the 2x8 blocking flat or horizontally between the joists then that might be part of the issue. Generally you can picture frame a deck without having to orient the blocking horizontally as shown in this article. And if it is done this way there is always lots of air flow on both sides of the boards.

Nov 02, 2017
Rating
starstarstarstarstar
Why does it cup?
by: Boo

Amazing that this article doesn't actually address why boards cup! They cup upwards because the side that is exposed to the sun can lose moisture content, even though it has been kiln dried, and shrinks. The side facing down does not the get the same exposure so shrinks *less*. The only option for the board to adjust is to curl.

I have *never* seen decking boards cup downwards. NEVER. It does not matter which way the grain goes, and with grooved boards you can't pick and choose based on grain. Fixing properly and maintaining properly is the only way to ensure longevity.

Editor's Comments

Thanks for your comments to round out the conversation. Keep in mind it is not uncommon to see wet deck boards which have been kept indoors and have never been exposed to sun can cup exactly as described in this article.

Jan 14, 2017
Rating
starstarstarstarstar
Timber cupping on a deck
by: Leigh

Hi. Is it possible that timber cupping on a deck could be caused by where the srews are placed?

Dec 10, 2016
Rating
starstarstarstarstar
Useful
by: Anonymous

This article is immensely useful. It quickly established the right and wrong ways of deck laying. Clearly when done incorrectly the results are disastrous. Thanks so much for posting this.

Click here to add your own comments

Join in and write your own page! It's easy to do. How? Simply click here to return to Deck Building Forum.

© 2004-2022 Decksgo.com. All Rights Reserved.