


Attaching a Ledger Board to Your House
The ledger board attachment for this home was challenging because it was done after the house was constructed. So you will learn how the siding was removed, and two layers of metal waterproof flashing were installed around the board. Complicating matters was the engineered I-joists that had to be reinforced.
It makes for a smooth, natural transition to have the deck at the same height or preferably a few inches lower than the kitchen floor.

But it’s also less labor-intensive and uses fewer materials than digging holes and setting another set of posts and beams to create a stand-alone deck.
There are various ways to attach the ledger, but our example is quite typical for vinyl clapboard style siding and is waterproof for peace of mind!
Remove Siding
Determine the outside dimensions of the framing for the deck and add ½" to 1" to that length. This will give you a ¼" to ½" of extra room to maneuver the ledger if needed.
Determine the floor joists' location so that you will know exactly where to cut and remove the siding. You can figure this out by looking under the last row of siding.
You should be able to see the concrete foundation and 2x6 sill plate. If you allow 1.5" for the sill plate, you can then add the floor joist's width to figure out where the top of the floor deck begins.
A 2x10 joist is usually about 9 ¼". If you are not sure, go into your basement and measure the joist.
Once you are sure about the joist location, mark out the cutaway area's outer shape using a soft pencil or marker and a straight edge.
Use a sharp razor knife and a straight edge as a guide to score (cut) the vinyl, and after several passes, gradually cut through. You want to avoid cutting up the house wrap beneath, if possible.
Important
  |
This method requires flashing to slip underneath the siding and then overlap the ledger. So when you cut away the siding, you must be sure there is enough room for the flashing to slip up and under the siding. You need at least 4" of the flashing under the last row of siding and ideally 8". In other words, do not haphazardly cut the siding away only to find that there is just 1-2" of room remaining because of the connection to the next higher piece of siding. If you plan ahead, you can avoid ever making this error and simply lower the board another inch or two. |
Set the Height of the Ledger Board
Mark on the exposed house wraps the top edge of the ledger. Add on the thickness of the deck board material and mark the top of the finished deck surface as well.
Are you happy with the transition from the house to the deck? A good transition is about 3 to 4" lower than the floor inside the house.
This should still allow for plenty of room to attach the board to the floor's rim joist.
But keep this in mind as you play with various elevations, and don't forget that you need to position the ledger board and cut the siding at a point that will allow the top flashing to fit under the siding at least 3 to 4".
Once you have set the height of the finished floor and worked backward to determine where the ledger board's bottom edge will be, mark that location on the foundation wall.
Block Joists from Inside the House
 |
This is a crucial step to properly attaching a ledger board, especially in homes built with engineered trusses. The problem with engineered trusses used as rim joists is that they do not provide a solid surface to bolt the ledger into like dimensional lumber. So you must install extra blocking yourself between each joist. Go down into the basement and get the exact measurement between joists, cut some 2x8, and fit it into place between the joists to rest on top of the sill plate. Screw the 2x8s into the top and bottom edges of the rim joist. This is crucial because all the force of the deck will transfer to these points. |
Peel and stick membranes update
Recently, there has been a move to using non-conductive peel and stick membranes like "Blue Skin" and others. This is not yet mandated everywhere, and we are watching to see if and when this becomes mandated or remains merely a prescriptive measure. You can see how windows and doors are sealed, and a similar process would apply in areas where an ACQ treated ledger board is attached to the house.
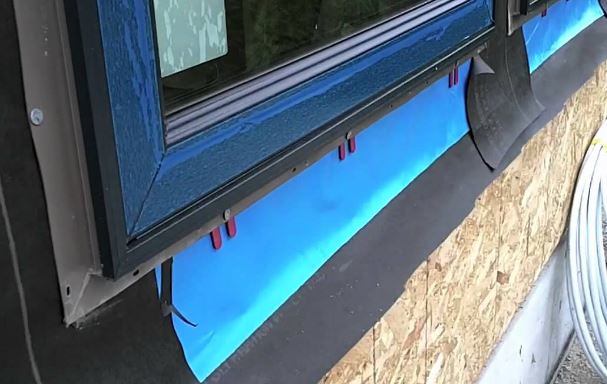
So keep this in mind as it may apply in your area. The concern is that the ACQ chemicals in treated lumber may, in some cases, be strong enough to start corroding even zinc-coated flashing.
Install First Flashing Piece

Position the first piece of flashing by tacking it in place. But also transfer the markings on the house wrap for the bottom of the ledger board, rim joist height and top of deck boards to the flashing. Use masking tape.
A storyboard is a strip of wood placed against a wall with predefined measurements and commonly used when installing siding to keep the boards parallel.
In this case, you are not creating a storyboard as much as you are “telling the story” – the story of where the sill plate, joist, and floor deck are located.
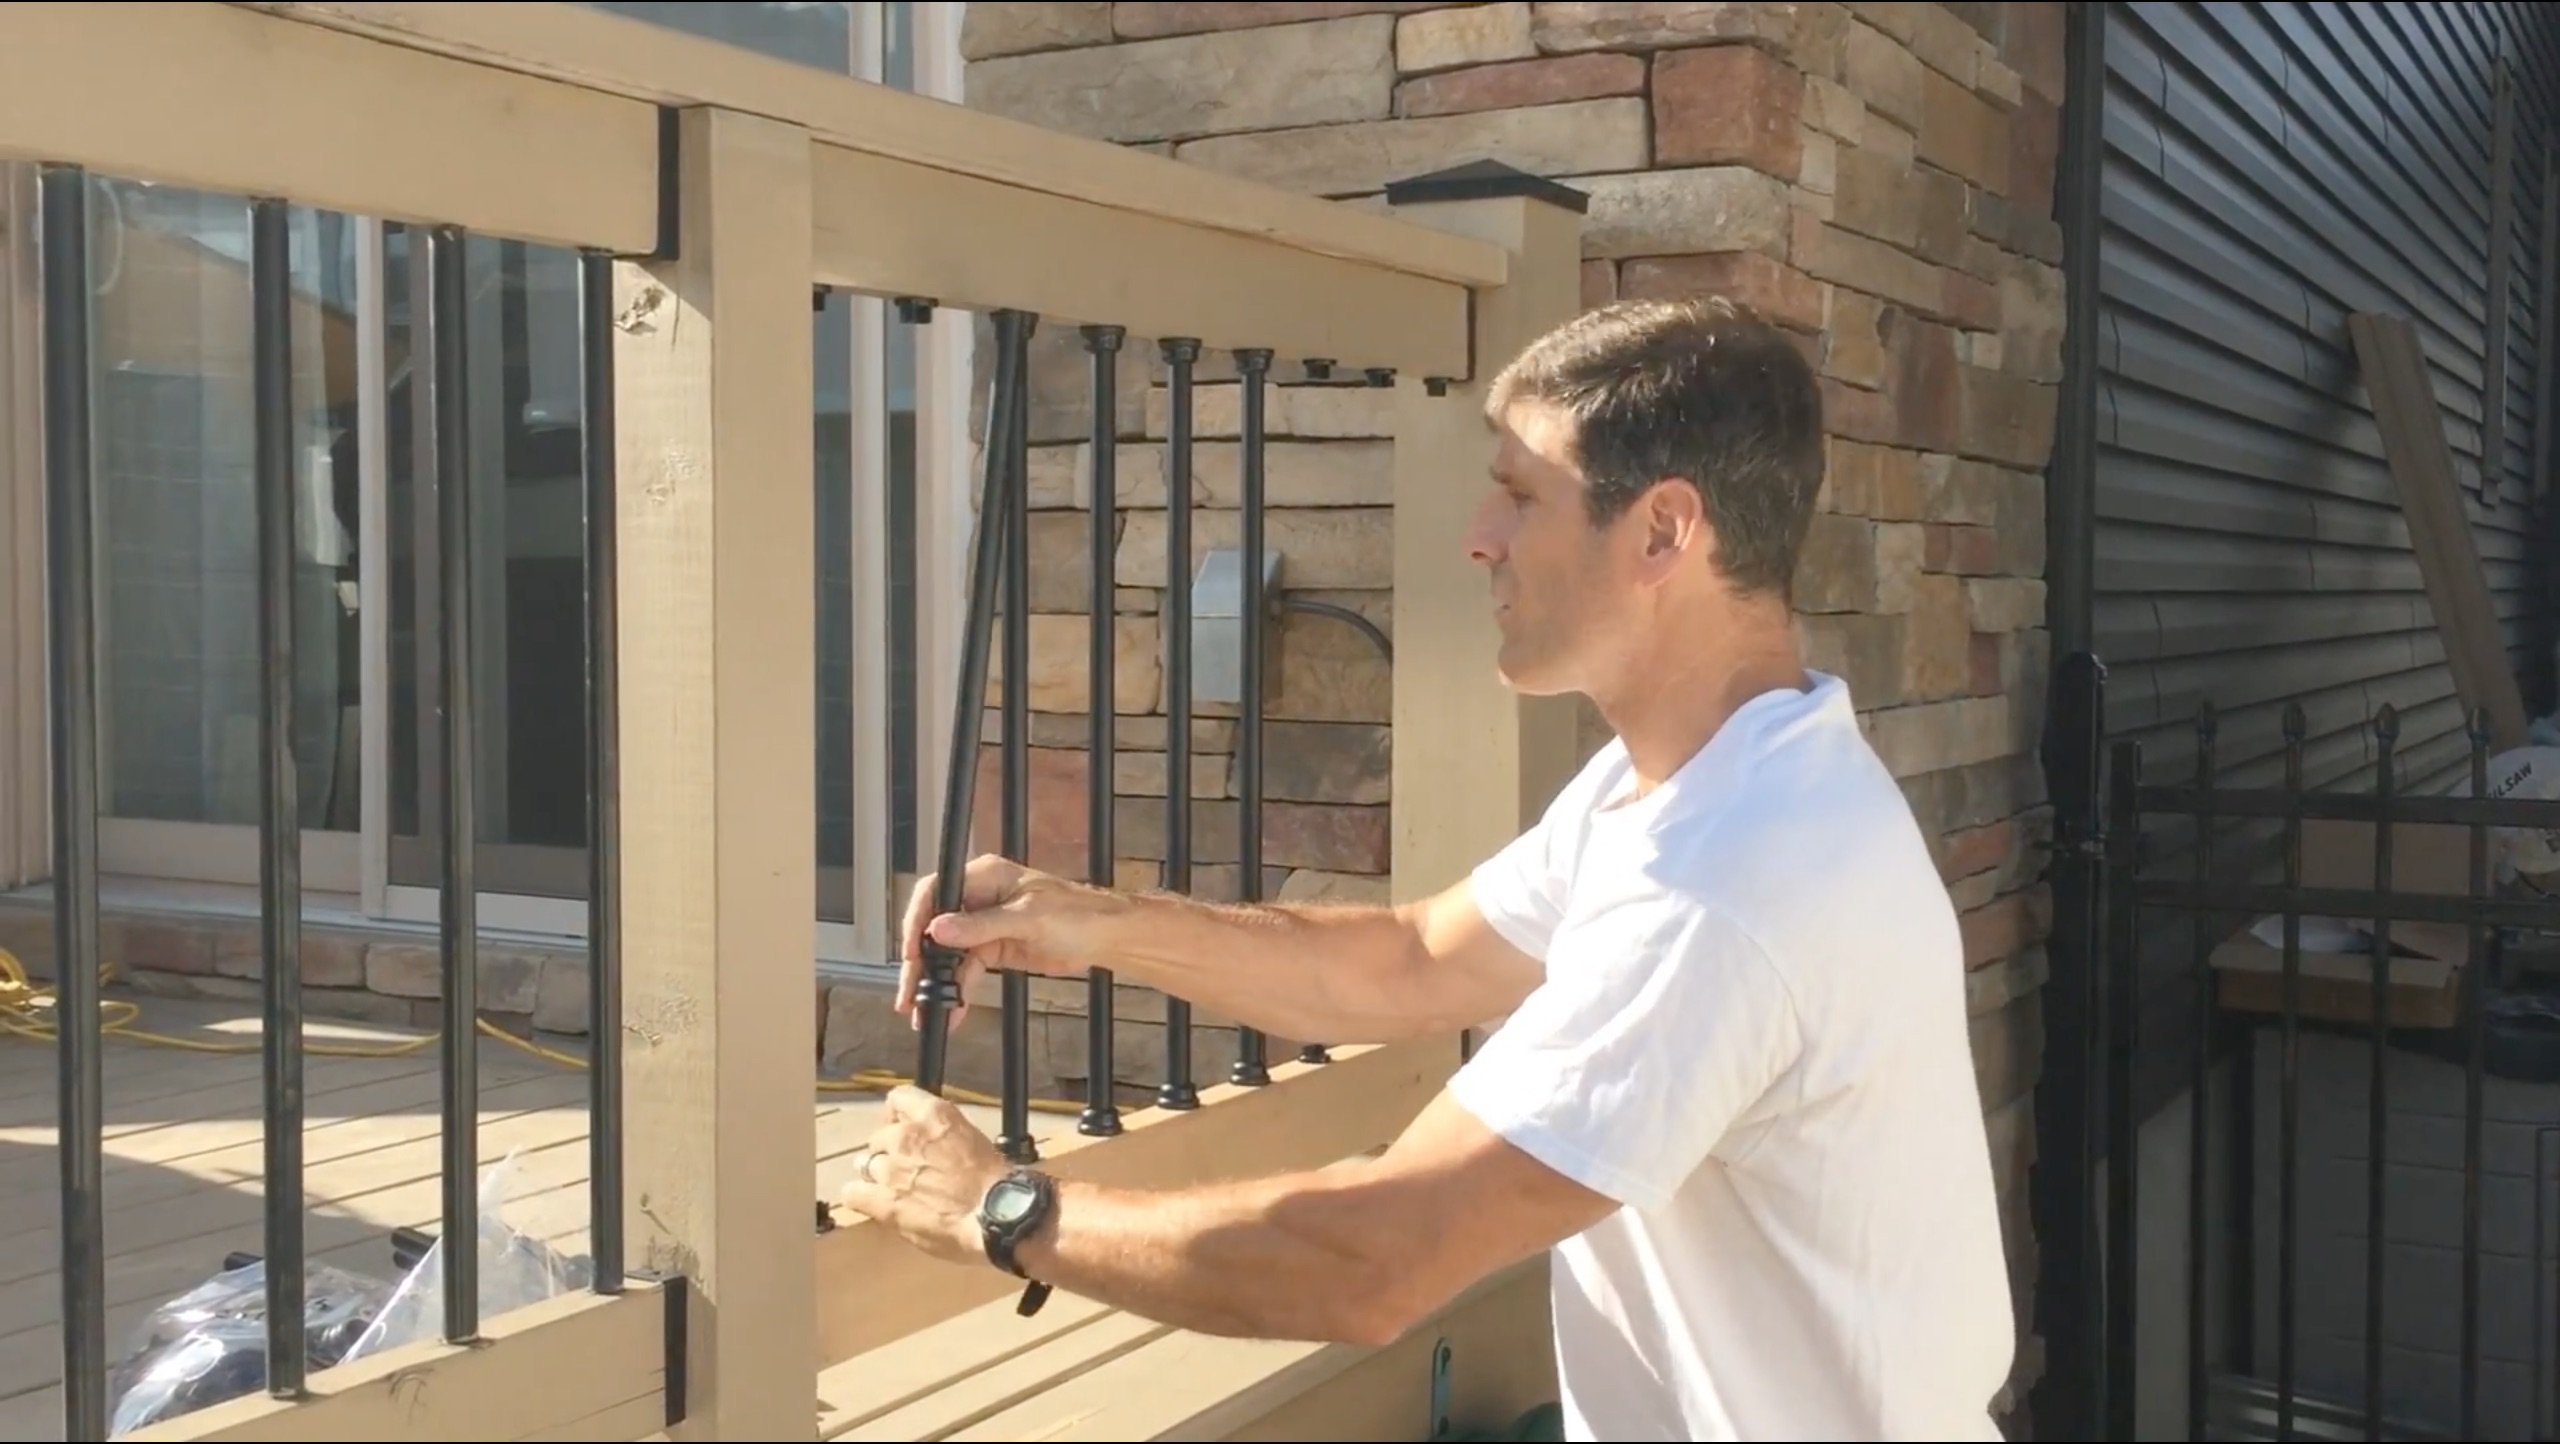
Bolt Ledger in Place
Remember the storylines that you marked on the first piece of flashing? They come in handy because you should have marked the top of the finished deck and head of the ledger lines.
You will have to transfer these markings to the ledger once it is tacked into its intended position.
   |
With the help of a friend, position the ledger against the flashing so the top edge is in line with its corresponding marking on the flashing. Tack the ledger board in place for now using a 2 ½” spiral nail. Do not pound the nail entirely. Check for level across the length of the ledger board. Mark the positions where the joists will go along the ledger board. Ideally, they should be in line with the floor joists for simplicity. Using a ½” spade bit bore at least two holes through the ledger board, one above each other, between each joist. The number of bolts required depends upon the expected load on the deck. Bore through the ledger and right through the rim joist and into the blocking. To be safe, do not be afraid to put four bolts between each set of joists—two bolts top and bottom on the left and right side of each joist. Now pry the ledger board away from the flashing. Then you can check to see if you are bored through the blocking by looking from inside the basement. If not, drill again and complete the bore. Cut a notch for any obstacles like a gas line. Place ½” bolts into each hole in the ledger board. Use washers under each nut's head and ideally (but not essential) two washers on the backside of the bolt to create a small air space between the ledger and the first flashing. Water should never get back here, but if it ever does, it has a means of egress keeping the ledger from ever rotting. With the help of a friend, re-position the ledger bo. Line up the bolts into the holes and push them through the blocking. Screw the nuts with washers from the basement side and tighten up the connections. |
Install Second Flashing
 |
The second piece of flashing will have to be custom cut to fit up underneath the siding. Remember that you should try to get at least 4” up under the siding because this is your first line of defense from the rain and blowing snow. You may not be able to pry back the siding far enough to nail it against the house. If that is the case, use construction adhesive and run a thick bead as far up and under the siding as possible. Now slide the flashing under the siding and on top of the adhesive. Now, push the flashing tight against the adhesive to ensure a secure and watertight fit. |
 |
Ensure the flashing is a bit longer than the ledger so that you can bend the exposed flashing over the ends to direct rainwater away. The bottom edge of the flashing should be at least 3” so that it fully covers the ledger board and goes past about 1”. As you can see, the best time to install a ledger for a deck is during the house's construction and framing before the siding crew arrives. But that is not always possible. |
Attach Joist Hangers
Install the joist hangers onto the face of the ledger board. You must have a framing plan for the deck structure to know where each joist hanger is located.
Proper planning involves laying out the framing of your deck before getting to this stage of the deck building process.
Home > Building A Deck > Ledger Board


Recent Articles
-
Pergola on brick paver
Apr 05, 25 05:36 PM
I have a brick paver patio that has been in for 10 years and I would like to know if the deck anchor will penetrate the gravel/sand base -
Durability of Titan deck foot
Apr 05, 25 05:20 PM
Hi, can you advise the estimated life of a Titan Deck Foot installed in the ground? How long is it expected to last? I live in an area in Ontario Canada -
10x8 6 person spa deck
Jul 26, 22 12:17 PM
I think I might be over-engineering this but I live in CT and I'm also worried about snow weight. Adding a 8x10 deck attached to existing deck, 2x10's


It's time to start
making your memories.

How-To
Go Learn More
© 2004-2026 Decksgo.com. All Rights Reserved.